Trusted by 150+ Homeowners
Wet Insulation Removal & Replacement in Garland, TX
- Over 150 5-Star Reviews
- Free Estimates and Quotes
- 100% Satisfaction Guaranteed
- Child, Family & Pet Safe Steps
- 24-Hour Emergency Service
- Fully Licensed & Insured

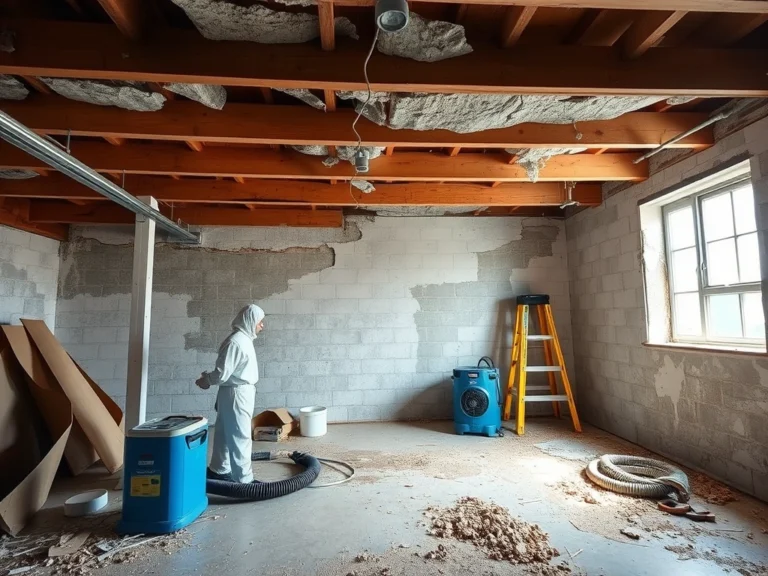
Battling Attic Dampness? We Handle Wet Insulation Removal & Replacement in Garland, TX
Here around Garland, TX, we know how quickly a sudden downpour or a leaky pipe can turn your cozy home into a damp mess. That Texas humidity combined with unexpected water intrusion means your insulation can become waterlogged in no time. Ignoring wet insulation is like inviting mold and structural issues to move in. We’re here to help you tackle that soggy situation head-on and get your property back to feeling dry and secure.
Homeowners throughout the area have trusted our team for over 165 five-star reviews, not just for quick fixes, but for thorough and careful work. When it comes to removing compromised insulation and putting in fresh, dry material, you want a local crew that understands the specific challenges around here. We focus on getting it right, the first time, protecting your investment and your family’s comfort.
- We target the root cause of moisture to prevent future saturation of your new insulation.
- Our meticulous removal process ensures no mold spores or damp debris are left behind, safeguarding your indoor air quality.
- We install high-performance, dry insulation that restores your home’s energy efficiency and comfort levels.
How We Tackle Wet Insulation Removal & Replacement
Dealing with wet insulation isn’t just about pulling out the old stuff; it’s a detailed process that requires the right approach and equipment. When we handle wet insulation removal, we’re not just clearing out a problem. We’re setting the stage for effective drying and proper re-insulation, which is crucial for preventing long-term damage. Cutting corners here can lead to persistent mold growth and wasted energy bills down the road.
Step 1: Initial Assessment and Containment
First, our technicians thoroughly inspect the affected areas to determine the extent of the water damage and the type of insulation compromised. We’ll then set up containment barriers to prevent the spread of moisture and potential contaminants to other parts of your home. This critical first step usually takes a few hours, depending on the size of the affected space.
Step 2: Safe Insulation Removal
Using specialized equipment like industrial vacuums and protective gear, we carefully remove all saturated insulation. This is done to avoid cross-contamination and to ensure we get every last bit of damp material. This phase can take anywhere from half a day to a full day, depending on how much insulation needs to be removed.
Step 3: Thorough Drying and Dehumidification
After removal, we deploy powerful air movers and dehumidifiers to dry out the cavity. This step is essential for preventing mold growth and ensuring the structural components are completely dry before new insulation is installed. This drying period typically lasts several days, often 3-5 days, but can vary based on humidity levels and the extent of saturation.
Step 4: Mold and Mildew Treatment (If Necessary)
If we find any signs of mold or mildew growth during the removal process, we’ll treat the affected surfaces with professional-grade antimicrobial solutions. This ensures a clean and healthy environment before we proceed with re-insulation. This is usually done within a day after the drying phase is complete.
Step 5: New Insulation Installation
Once the area is confirmed dry and clean, we install new, high-quality insulation that’s appropriate for your home’s needs. We offer various types of insulation to maximize energy efficiency and comfort. This final step usually takes one to two days to complete.
Don’t let water-damaged insulation linger. Act quickly to protect your home and call us for a professional assessment. We’ll guide you through the entire process, ensuring your property is restored correctly.
Warning Signs You Need Wet Insulation Removal & Replacement
Catching wet insulation early can save you a lot of headaches and money. Ignoring these signs can lead to bigger, more expensive problems like structural rot and widespread mold. Knowing what to look for is your first line of defense.
Musty Odors That Won’t Go Away
A persistent damp, musty smell, especially in your attic or walls, is a classic sign of moisture trapped in insulation. This smell often indicates the beginnings of mold or mildew growth. Don’t ignore persistent smells; they are your nose’s way of telling you something is wrong.
Visible Water Stains or Damp Spots
Look for discolored patches or actual dampness on your ceiling, walls, or attic floor. These are clear indicators that water has penetrated your insulation and building materials. Address damp spots immediately to prevent further damage.
Increased Energy Bills
Waterlogged insulation loses its R-value, meaning it can’t insulate your home effectively. If you notice your heating or cooling bills suddenly climbing without explanation, it could be your insulation is compromised. Monitor your energy usage closely for sudden spikes.
Sagging or Clumped Insulation
Dry insulation typically has a fluffy, even appearance. If you see insulation that looks flattened, clumped together, or is visibly sagging away from the ceiling or wall studs, it’s likely saturated and losing its structural integrity. Inspect your insulation’s appearance for signs of damage.
Mold or Mildew Growth
In severe cases, you might see visible signs of mold or mildew on surfaces near the insulation, like on rafters or drywall. This is a serious health concern and requires immediate professional attention. Investigate any mold sightings thoroughly.
Unexplained Temperature Fluctuations
If certain rooms in your home are consistently colder in the winter or hotter in the summer, despite your HVAC system running, it could be a sign of ineffective insulation. Wet insulation drastically reduces its ability to regulate temperature. Pay attention to comfort inconsistencies in your home.
Wet Insulation Removal & Replacement vs. DIY: When To Call a Professional
| Situation | DIY? | Call a Pro? | Why |
|---|---|---|---|
| Minor attic condensation | Yes, if it’s just surface dampness and you can dry it thoroughly. | Yes, if the dampness is extensive or recurring. | Pros have specialized drying equipment to prevent hidden moisture. |
| Small leak from a pipe in a wall cavity | No. | Yes. | Accessing and drying wall cavities is complex and requires professional tools. |
| Saturated attic insulation after a storm | No. | Yes. | Large amounts of wet insulation are heavy, messy, and require specialized removal and drying equipment. |
| Identifying the source of a leak causing wet insulation | Maybe, for very obvious external leaks. | Yes, especially for hidden or complex leaks. | Professionals can accurately diagnose and repair the leak source to prevent recurrence. |
| Replacing insulation in a small, easily accessible crawl space | Yes, if you’re comfortable with the work and have proper ventilation. | Yes, if the space is cramped or there are signs of mold. | Cramped spaces pose safety risks and require specialized ventilation knowledge. |
| Complete removal and replacement of extensive wet insulation | Absolutely not. | Yes. | This requires industrial-grade equipment, safety protocols, and certified drying expertise. |
While minor dampness might seem like a DIY job, significant water saturation in insulation is a job for the pros. Trusting professionals ensures the complete removal of moisture, prevention of mold, and proper re-insulation for your home’s health and efficiency. We have the tools and know-how to do it right.
Wet Insulation Removal & Replacement Cost In Garland, TX
The cost for wet insulation removal and replacement in Garland, TX, can vary significantly. Factors like the size of the affected area, the type of insulation, the extent of saturation, and the complexity of the water source all play a role in the final price. These figures are estimates to give you a general idea.
| Service | Typical Price Range | What Affects Cost |
|---|---|---|
| Attic Insulation Removal (per sq ft) | $1.00 – $3.00 | Depth of insulation, accessibility, and volume of material. |
| Wall Insulation Removal (per linear ft) | $2.00 – $5.00 | Accessibility through drywall, type of wall construction. |
| Professional Drying Services (per day) | $300 – $700 | Size of the space, number of dehumidifiers and air movers needed. |
| Mold Remediation (if required) | $500 – $3,000+ | Severity of mold growth and square footage affected. |
| New Insulation Installation (blown-in cellulose/fiberglass) | $1.00 – $3.00 per sq ft | R-value desired, type of insulation material chosen. |
| Minor Leak Source Repair | $200 – $1,000+ | Complexity of the repair, materials needed, and time to fix. |
Getting an accurate quote requires a thorough on-site assessment. We offer free estimates to provide you with a clear understanding of the scope and cost for your specific situation. Let us take the guesswork out of it.
Service Areas Near Garland, TX
Rockwall, Mesquite, Rowlett, Sachse, Wylie, Richardson, Plano, Dallas, Carrollton, Addison, Sunnyvale, Forney, Crandall, Kaufman, Royse City, Fate, Terrell, Allen, Murphy, Parker
Common Questions About Wet Insulation Removal & Replacement
My attic insulation got wet from rain. How long does it take to dry?
Drying time depends on how saturated the insulation is and the ambient humidity. We use powerful dehumidifiers and air movers to speed up the process, but it can still take several days, often 3-5 days, for the cavities to dry completely before new insulation can be installed. We monitor the moisture levels closely to ensure it’s ready.
Is wet insulation a health hazard in my home?
Yes, it absolutely can be. Wet insulation is a breeding ground for mold and mildew, which can release spores into your air. These spores can cause respiratory problems, allergies, and other health issues for your family. Addressing wet insulation promptly is crucial for your home’s health.
How much does it typically cost to remove and replace wet insulation?
The cost varies greatly based on the size of the affected area and the amount of insulation needing removal and replacement. For a typical attic, you might expect a range of $1,000 to $4,000 or more, depending on the complexity and whether mold remediation is needed. We provide free estimates after an inspection to give you a precise cost.
What happens if I just let the wet insulation dry on its own?
If you let wet insulation dry on its own without professional intervention, there’s a high risk of mold and mildew developing within the insulation and the surrounding building materials. This can lead to persistent musty odors, structural damage, and significant indoor air quality problems. Professional drying is essential to prevent these secondary issues.
Can I prevent my insulation from getting wet in the first place?
You can take proactive steps like ensuring your roof is in good repair, checking for proper sealing around vents and chimneys, and inspecting plumbing for leaks. Regular attic inspections can help you spot potential issues before they lead to water damage. Maintaining your home’s exterior and interior systems is key to preventing insulation saturation.
Check Our Other Relevant Services

Paul Kerns: Damage Restoration Expert
Paul Kerns is a licensed restoration authority with over 20 years of experience in disaster recovery and property mitigation. His extensive background makes him a leading voice in restoring residential and commercial structures to pre-loss condition with precision and care.
𝗖𝗲𝗿𝘁𝗶𝗳𝗶𝗰𝗮𝘁𝗶𝗼𝗻𝘀: Paul is highly credentialed through the IICRC, holding specialized certifications in Water Damage Restoration, Mold Remediation, Applied Structural Drying, Odor Control, and Fire and Smoke Restoration. His technical expertise ensures every project adheres to rigorous safety and environmental standards.
𝗕𝗲𝘀𝘁 𝗣𝗮𝗿𝘁 𝗼𝗳 𝘁𝗵𝗲 𝗝𝗼𝗯: Paul finds the most reward in providing a sense of calm during a crisis, helping clients navigate the complexities of recovery to reclaim their homes.
𝗙𝗮𝘃𝗼𝗿𝗶𝘁𝗲 𝗣𝗮𝘀𝘁𝗶𝗺𝗲: Outside of work, Paul enjoys restoring vintage furniture and fishing at the lake.