Trusted by 150+ Homeowners
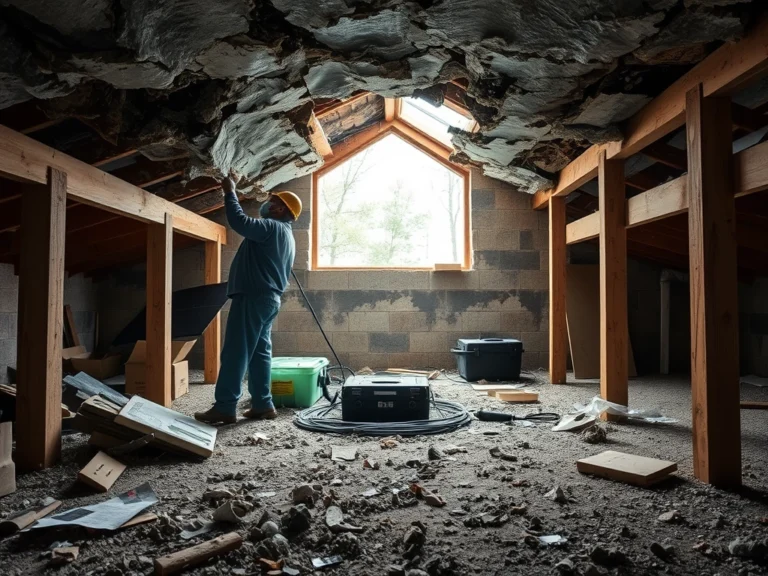
Wet Insulation Removal & Replacement in Little Elm, TX
- Over 150 5-Star Reviews
- Free Estimates and Quotes
- 100% Satisfaction Guaranteed
- Child, Family & Pet Safe Steps
- 24-Hour Emergency Service
- Fully Licensed & Insured

Don’t Let Wet Insulation Ruin Your Home: Expert Removal & Replacement in Little Elm, TX
If you’ve discovered wet insulation in your attic or walls, you’re likely feeling a mix of concern and urgency. Ignoring damp insulation is a common mistake that can lead to much bigger problems down the road. It doesn’t just sit there; it actively works to degrade your home’s structure and your family’s health. We understand that finding this kind of damage is stressful, and you need a clear plan of action to get your property back to normal quickly and effectively. That’s why our team is ready to help you tackle this issue head-on, right here in Little Elm, TX.
Homeowners around here have trusted us to handle their insulation emergencies for years, and we’re proud to say we’ve earned over 165 five-star reviews from satisfied neighbors. When it comes to something as critical as protecting your home’s integrity, you want a team that understands the local climate and common issues. We’ve seen firsthand how quickly wet insulation can cause damage, and our priority is always to provide a swift, thorough, and reliable service that gets your home dry and safe again. You can be confident we’ll treat your property with the care it deserves.
- We specialize in the rapid removal of soggy, compromised insulation, preventing further moisture intrusion and structural damage before it escalates.
- Our process includes thorough drying and decontamination of affected areas, ensuring a healthy environment for your family and preventing mold growth.
- We install new, high-quality insulation that meets or exceeds industry standards, restoring your home’s energy efficiency and protecting your investment.
How Wet Insulation Removal & Replacement Actually Works
Dealing with wet insulation requires a methodical approach, and our team follows a strict, proven process to ensure the job is done right the first time. You might be tempted to just let it dry out on its own, but that’s rarely enough and can actually make things worse. Delaying professional intervention can lead to widespread mold, compromised structural integrity, and significantly higher repair costs. We’re committed to a detailed process that addresses the immediate problem and prevents future issues, giving you true confidence in your home’s safety.
Step 1: Initial Assessment and Containment
As soon as you contact us, our technicians will arrive promptly to assess the extent of the wet insulation. We’ll use specialized moisture meters to pinpoint exactly how widespread the issue is and take immediate steps to contain the affected area, preventing further water spread. Containing the moisture is our first priority. This step typically takes 1-2 hours, depending on the complexity of your home’s layout.
Step 2: Water Extraction (If Applicable)
If there is standing water associated with the wet insulation, we’ll use powerful extraction equipment to remove it as quickly as possible. This might involve submersible pumps and industrial-grade wet vacuums. Removing standing water is crucial to halt the damage and begin the drying process. This can take anywhere from a few hours to a full day, depending on the volume of water.
Step 3: Insulation Removal
Once the area is assessed and any standing water is gone, our crews will carefully remove the saturated insulation. We use specialized tools and protective gear to ensure this is done safely and efficiently, preventing the spread of mold spores or contaminants. Removing compromised materials is essential for a healthy indoor environment. This process can take 4-12 hours, depending on the size of the affected space and the type of insulation.
Step 4: Drying and Dehumidification
After the old insulation is out, we bring in industrial-grade drying equipment, including air movers and dehumidifiers. These machines work around the clock to remove residual moisture from your walls, ceilings, and framing. Thorough drying prevents mold and secondary damage. This critical phase can last anywhere from 24 hours to several days, monitored closely by our team.
Step 5: Mold Inspection and Remediation (If Necessary)
As part of the drying process, we conduct a thorough inspection for any signs of mold growth. If mold is detected, our certified technicians will perform professional mold remediation to ensure your home is completely clean and safe. Addressing mold growth is non-negotiable for your family’s health. This step’s duration varies greatly, from a few hours to several days, depending on the severity of mold present.
Step 6: New Insulation Installation
Once we’ve confirmed the area is completely dry and free of any mold, we’ll install new, high-quality insulation. We offer various types of insulation to best suit your home and budget, ensuring optimal performance and energy efficiency moving forward. Installing fresh insulation restores your home’s comfort and value. This final step typically takes 4-8 hours for a standard attic space.
Don’t let wet insulation linger in your home; early intervention saves money and prevents severe damage. Call us today to get your property inspected and restored.
Warning Signs You Need Wet Insulation Removal & Replacement
Catching the signs of wet insulation early can save you a significant amount of money and prevent much larger, more complex issues from developing. Your home will often give you clues that something isn’t right if you know what to look for. Paying attention to subtle changes can make all the difference in protecting your property and your family’s well-being.
Musty Odors That Won’t Go Away
A persistent, damp, or musty smell, especially in your attic or crawl spaces, is a strong indicator of moisture. This smell often means mold or mildew has started to grow on or within the insulation. Investigating strange smells is your first line of defense.
Visible Water Stains or Damp Spots
If you see brown or discolored patches on your ceilings, walls, or around light fixtures, especially after rain or a leak, it’s a clear sign of water intrusion. These stains mean moisture has saturated the insulation behind the surface. Addressing water stains promptly is key to preventing further damage.
Sagging or Clumped Insulation
Dry insulation typically has a fluffy, even appearance. When insulation becomes wet, it loses its loft, becoming heavy, dense, and often visibly sagging or clumping together. Observing insulation’s condition can reveal hidden moisture.
Increased Energy Bills
Wet insulation loses its ability to effectively insulate your home. This means your HVAC system has to work harder to maintain a comfortable temperature, leading to higher energy consumption and bills. Noticeable bill increases can point to insulation problems.
Mold or Mildew Growth
In damp environments, mold and mildew can begin to grow on insulation and surrounding building materials. You might see fuzzy patches of black, green, or white growth, or just notice the distinct odor associated with it. Preventing mold spread is a health priority.
Condensation on Pipes or Ducts
If you notice excessive condensation forming on pipes or ductwork in your attic or crawl spaces, it can be a sign that the surrounding insulation is failing due to moisture. Checking for condensation is a good preventative measure.
Wet Insulation Removal & Replacement vs. DIY: When To Call a Professional
| Situation | DIY? | Call a Pro? | Why |
|---|---|---|---|
| Small, isolated damp spot in attic | Maybe | Yes | To ensure proper drying and prevent hidden mold growth. |
| Suspected widespread saturation from roof leak | No | Yes | Requires professional equipment for extraction and drying. |
| Musty odor with no visible signs | No | Yes | Hidden moisture and potential mold require professional assessment. |
| Insulation looks visibly soaked and heavy | No | Yes | Heavy, saturated insulation is difficult and hazardous to remove yourself. |
| After major water damage (burst pipe, flood) | No | Yes | This is a serious situation requiring rapid, professional response. |
| Replacing a small section of insulation | Yes | No | If you’re confident the area is dry and mold-free, a small DIY replacement is possible. |
While some minor issues might seem like DIY fixes, professional assessment is often crucial for wet insulation. The risks of mold, structural damage, and ineffective drying are too high to gamble with. Our team has the specialized knowledge and equipment to handle these situations correctly, ensuring your home is truly dry and safe.
Wet Insulation Removal & Replacement Cost In Little Elm, TX
The cost for wet insulation removal and replacement in Little Elm, TX, can vary significantly based on the extent of the damage, the size of the affected area, and the type of insulation needed. These figures are estimates to give you a general idea of potential expenses. Understanding potential costs helps you prepare for the restoration process.
| Service Aspect | Typical Price Range | What Affects Cost |
|---|---|---|
| Professional Assessment & Moisture Testing | $300 – $700 | Size of property, complexity of assessment. |
| Water Extraction (if needed) | $500 – $2,000 | Volume of water, accessibility of affected areas. |
| Insulation Removal (per sq ft) | $1 – $3 | Type of insulation, ease of access, amount to be removed. |
| Drying & Dehumidification (per day) | $200 – $500 | Size of affected space, duration of drying needed. |
| Mold Inspection & Remediation | $500 – $5,000+ | Severity of mold growth, square footage affected. |
| New Insulation Installation (per sq ft) | $1.50 – $5.00 | Type of insulation (fiberglass, cellulose, spray foam), R-value. |
It’s important to remember that these are estimated ranges. A precise quote requires an on-site inspection by our certified technicians. We offer free, no-obligation estimates to provide you with accurate pricing for your specific situation.
Service Areas Near Little Elm, TX
Little Elm, Lake Dallas, Hackberry, Frisco, The Colony, Prosper, Corinth, Shady Shores, Pilot Point, Sanger, Celina, Aubrey, Denton, Lewisville, Carrollton, Richardson, Dallas, Plano, Allen, McKinney.
Common Questions About Wet Insulation Removal & Replacement
How long does wet insulation removal and replacement typically take?
The timeline for wet insulation removal and replacement can vary greatly depending on the severity of the moisture damage. While the actual removal and installation might take 1-3 days, the crucial drying phase can extend the process to 3-7 days or even longer, especially if significant water saturation or mold is present. Prompt professional attention can help expedite the drying and restoration process.
What are the health risks associated with wet insulation?
Wet insulation is a breeding ground for mold and mildew, which can release spores into your home’s air. Inhaling these spores can cause respiratory issues, allergic reactions, headaches, and exacerbate conditions like asthma. Ensuring a mold-free environment is vital for your family’s health. Our team prioritizes safe removal and thorough remediation.
Will my homeowner’s insurance cover wet insulation removal and replacement?
Coverage for wet insulation removal and replacement depends heavily on the cause of the moisture. Damage from sudden, accidental events like a burst pipe or a storm-related leak is often covered. However, damage resulting from gradual issues like poor maintenance or slow leaks might not be. Documenting the damage thoroughly is important for insurance claims. We can help you navigate this process.
What kind of equipment do you use to dry out wet insulation areas?
We utilize professional-grade equipment designed for rapid and effective drying. This includes high-powered air movers to circulate air, industrial dehumidifiers to extract moisture from the air, and specialized moisture meters to track progress and ensure complete dryness. Advanced drying technology is key to preventing secondary damage. Our equipment is a significant part of our ability to restore your property quickly.
Can I just leave wet insulation to dry on its own?
While some minor dampness might eventually dry, it’s generally not advisable to leave wet insulation to dry on its own. This process is extremely slow and allows mold and mildew to establish a foothold, compromising your home’s structure and air quality. Professional drying speeds up the process significantly and ensures a more complete restoration. We take the guesswork out of the drying equation.
Check Our Other Relevant Services
- Pressure Washing Exteriors in Little Elm, TX
- Disaster Response & Recovery Services in Little Elm, TX

Paul Kerns: Damage Restoration Expert
Paul Kerns is a licensed restoration authority with over 20 years of experience in disaster recovery and property mitigation. His extensive background makes him a leading voice in restoring residential and commercial structures to pre-loss condition with precision and care.
𝗖𝗲𝗿𝘁𝗶𝗳𝗶𝗰𝗮𝘁𝗶𝗼𝗻𝘀: Paul is highly credentialed through the IICRC, holding specialized certifications in Water Damage Restoration, Mold Remediation, Applied Structural Drying, Odor Control, and Fire and Smoke Restoration. His technical expertise ensures every project adheres to rigorous safety and environmental standards.
𝗕𝗲𝘀𝘁 𝗣𝗮𝗿𝘁 𝗼𝗳 𝘁𝗵𝗲 𝗝𝗼𝗯: Paul finds the most reward in providing a sense of calm during a crisis, helping clients navigate the complexities of recovery to reclaim their homes.
𝗙𝗮𝘃𝗼𝗿𝗶𝘁𝗲 𝗣𝗮𝘀𝘁𝗶𝗺𝗲: Outside of work, Paul enjoys restoring vintage furniture and fishing at the lake.