Trusted by 150+ Homeowners
Wet Insulation Removal & Replacement in River Oaks, TX
- Over 150 5-Star Reviews
- Free Estimates and Quotes
- 100% Satisfaction Guaranteed
- Child, Family & Pet Safe Steps
- 24-Hour Emergency Service
- Fully Licensed & Insured

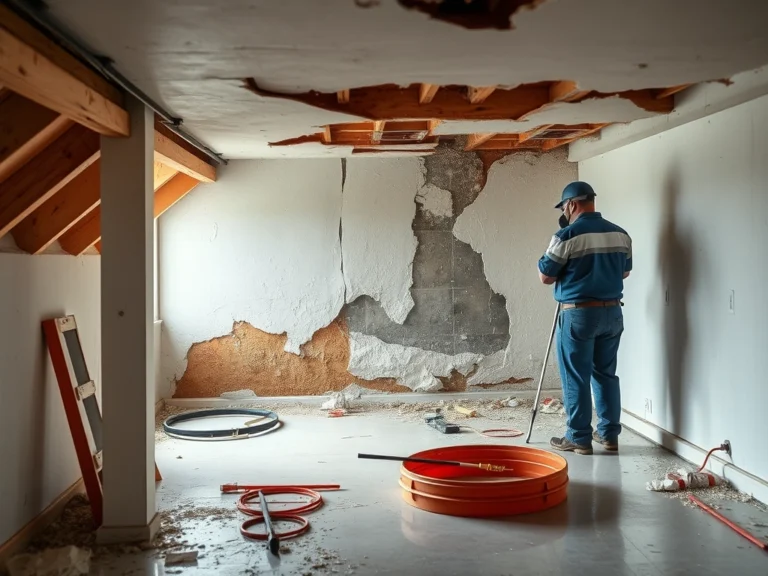
Don’t Let Damp Insulation Ruin Your River Oaks Home
Around here, especially during our humid summer months or after a sudden downpour, it’s pretty common for attics and crawl spaces to get a little damp. If you’ve noticed a musty smell or seen water stains on your ceiling, it’s likely your insulation has soaked up some moisture. This isn’t just an inconvenience; wet insulation can lead to serious problems down the line, from mold growth to structural damage. We’re here to help you tackle that dampness head-on with expert wet insulation removal and replacement services.
We’ve earned over 165 five-star reviews from folks right here in the area because we take this job seriously. Homeowners trust us for wet insulation issues because we’re meticulous, efficient, and always clear about what needs to be done. When your home is dealing with moisture problems, you want a team that understands the local climate and knows how to fix it right the first time. We’re that team, ready to restore your property’s comfort and safety.
- We focus on restoring your home’s energy efficiency by completely removing compromised insulation and installing fresh, dry material, helping to lower your utility bills.
- Our process helps prevent the growth of mold and mildew, which can thrive in damp environments, ensuring a healthier living space for your family.
- We work quickly to remove the moisture-saturated insulation, which stops further damage from spreading and can protect your home’s structure from costly repairs.
How We Tackle Wet Insulation Removal & Replacement
Dealing with wet insulation requires a careful, systematic approach. It’s not just about pulling out old stuff and shoving in new; you have to make sure the underlying moisture issue is resolved first, and then properly dry the area before new insulation goes in. Cutting corners here can mean the problem comes right back, or worse, creates new ones like mold. Our crews follow a proven process to ensure your insulation is removed safely and your home is set up for long-term protection.
Step 1: Thorough Assessment and Moisture Source Identification
The very first thing our technicians do is figure out exactly where the water came from and how widespread the damage is. This might involve checking roof leaks, plumbing issues, or condensation problems. Identifying the root cause of moisture is critical before we even think about removing insulation. This initial inspection usually takes a couple of hours, depending on the size of your property.
Step 2: Safe Removal of Wet Insulation
Once we know the source is addressed, we carefully remove the saturated insulation. We use specialized equipment to contain any dust or mold spores that might be released during this process. This step is crucial for preventing the spread of contaminants and ensuring a clean slate for new insulation. Depending on the area, this could take anywhere from a few hours to a full day.
Step 3: Drying and Dehumidification
This is a super important step that many people overlook. Before new insulation can be installed, the attic or crawl space needs to be completely dry. We bring in industrial-grade air movers and dehumidifiers to pull out every bit of residual moisture. This process can take several days, but it’s essential for preventing future mold growth and ensuring the new insulation performs as it should.
Step 4: Mold and Mildew Treatment (If Necessary)
If mold or mildew has already started to grow due to the dampness, we’ll treat those areas. Our team uses safe, effective treatments to kill existing mold and prevent its return. This ensures that your home’s air quality is protected and improved. This treatment is usually done after drying and before new insulation is installed.
Step 5: Installation of New, Dry Insulation
With the area clean, dry, and free of mold, we install brand-new insulation. We offer various types to best suit your home’s needs and local climate, ensuring it’s installed correctly to provide optimal thermal performance. This final step brings your home back to its intended comfort and energy efficiency, giving you long-lasting protection. This usually takes about a day.
If you’ve got damp insulation, don’t wait for the problem to get worse. Give our team a call to get it assessed and fixed properly.
Warning Signs You Need Wet Insulation Removal & Replacement
Catching these signs early can save you a lot of headaches and money. Ignoring damp insulation is like ignoring a small leak in your roof; it only gets worse. We’re here to help you spot the trouble before it becomes a major issue.
Musty Odors That Won’t Go Away
That persistent damp, musty smell, especially in your attic or crawl space, is a classic sign that your insulation is holding onto moisture. It’s often the first thing homeowners notice, and it means mold or mildew might be brewing.
Visible Water Stains or Discoloration
If you see dark spots or rings on your ceiling, walls, or the underside of your roof decking, it’s a clear indication that water has been present. These stains mean the insulation behind them is likely soaked and needs attention. This is a direct sign of water intrusion.
Increased Energy Bills
Wet insulation loses its ability to insulate effectively. If you’ve noticed your heating or cooling bills creeping up without any changes in your usage habits, your insulation might not be doing its job. Energy efficiency suffers when insulation is damp.
Sagging or Clumpy Insulation
When insulation gets wet, it can become heavy and start to clump together, losing its fluffy structure. You might see it sagging away from the joists or looking uneven. This is a visual cue that the insulation is compromised and ineffective.
Mold or Mildew Growth
Sometimes, you might actually see fuzzy patches of mold or mildew on your insulation or surrounding wood. This is a serious health concern and a definite sign that you need immediate professional help. Don’t try to clean this yourself; professional remediation is key.
Wet Insulation Removal & Replacement vs. DIY: When To Call a Professional
| Situation | DIY? | Call a Pro? | Why |
|---|---|---|---|
| Minor dampness in a small, accessible area of attic insulation | Possibly | Yes | It’s easy to miss the source of moisture or not dry the area completely yourself. |
| Suspected mold growth on insulation | No | Yes | Mold can be a serious health hazard and requires specialized containment and removal. |
| Extensive water damage affecting large sections of insulation | No | Yes | Large-scale removal and drying require professional equipment and expertise. |
| Insulation in a crawl space or hard-to-reach attic section | No | Yes | Access can be difficult and dangerous, and proper containment is vital. |
| Identifying the source of a persistent leak | No | Yes | Diagnosing and repairing the original water source is crucial to prevent recurrence. |
| Replacing insulation after a significant water event (burst pipe, major roof leak) | No | Yes | This involves multiple steps including drying, potential mold treatment, and proper re-insulation. |
For anything beyond minor, easily accessible damp spots, calling a professional is the smartest move. Our team has the tools, training, and experience to handle the entire process safely and effectively, ensuring your home is properly restored. We make sure the job is done right.
Wet Insulation Removal & Replacement Cost In River Oaks, TX
The cost for wet insulation removal and replacement in River Oaks, TX, can vary quite a bit. It really depends on how much insulation is affected, how difficult it is to access, and whether mold treatment is needed. These are just estimates to give you an idea, not exact quotes.
| Service | Typical Price Range | What Affects Cost |
|---|---|---|
| Wet Insulation Removal | $500 – $3,000+ | The square footage affected and the type of insulation being removed. |
| Drying and Dehumidification | $300 – $2,000+ | The size of the space and how long it takes to reach optimal dryness. |
| Mold Treatment and Remediation | $400 – $5,000+ | The extent of mold growth and the containment methods required. |
| New Insulation Installation | $1,000 – $4,000+ | The R-value needed, type of insulation (fiberglass, cellulose, spray foam), and total square footage. |
| Moisture Source Repair (Minor) | $200 – $1,000 | Simple fixes like sealing a small vent or minor caulking. |
| Full Attic/Crawl Space Assessment | $150 – $500 | Detailed inspection and moisture mapping. |
Getting a free estimate is the best way to understand the exact cost for your specific situation. We’ll come out, assess the damage, and provide you with a clear, detailed breakdown. We want you to feel completely informed and confident.
Service Areas Near River Oaks, TX
Fort Worth, Arlington, Dallas, Plano, Frisco, Irving, Carrollton, Richardson, Garland, Mesquite, Grand Prairie, Euless, Bedford, Hurst, Grapevine, Southlake, Colleyville, Keller, Roanoke, Trophy Club.
Common Questions About Wet Insulation Removal & Replacement
What happens if I don’t remove wet insulation?
If you leave wet insulation in place, it can lead to a cascade of problems. It loses its effectiveness, driving up your energy costs. More importantly, it creates a perfect environment for mold and mildew to grow, which can damage your home’s structure and, more critically, pose serious health risks to your family. We ensure all moisture is removed and the space is healthy before new insulation is installed.
How long does the wet insulation removal and replacement process take?
The timeline really depends on the extent of the damage and the specific conditions of your home. The removal itself might take a day or two, but the drying and dehumidification process can take anywhere from three to seven days or even longer to ensure the area is completely dry. Installing new insulation is usually the quickest part, often completed in a day. We’ll give you a more precise estimate after our initial assessment.
Is wet insulation removal covered by homeowner’s insurance?
Often, yes, but it depends heavily on the *cause* of the water damage. If the moisture came from a sudden, accidental event like a burst pipe or a major storm leak, your insurance may cover the removal and replacement. If it’s due to long-term neglect or poor maintenance, like slow leaks or condensation issues, it might not be covered. We recommend checking your policy and can help provide documentation for your claim.
What equipment do you use for wet insulation removal and drying?
We use industrial-grade equipment designed for water damage restoration. This includes powerful containment systems to prevent the spread of mold and debris during removal, high-capacity air movers to speed up evaporation, and specialized dehumidifiers to pull moisture out of the air and building materials. Our goal is to dry your home thoroughly and efficiently, ensuring a healthy environment.
How can I prevent my insulation from getting wet in the first place?
Preventing wet insulation involves regular home maintenance. This includes checking your roof for leaks, ensuring your gutters are clear and directing water away from your foundation, and properly sealing any gaps or cracks in your home’s exterior. In attics and crawl spaces, proper ventilation is key to reducing condensation. We can also inspect your home for potential moisture intrusion points during our assessments.
Check Our Other Relevant Services

Paul Kerns: Damage Restoration Expert
Paul Kerns is a licensed restoration authority with over 20 years of experience in disaster recovery and property mitigation. His extensive background makes him a leading voice in restoring residential and commercial structures to pre-loss condition with precision and care.
𝗖𝗲𝗿𝘁𝗶𝗳𝗶𝗰𝗮𝘁𝗶𝗼𝗻𝘀: Paul is highly credentialed through the IICRC, holding specialized certifications in Water Damage Restoration, Mold Remediation, Applied Structural Drying, Odor Control, and Fire and Smoke Restoration. His technical expertise ensures every project adheres to rigorous safety and environmental standards.
𝗕𝗲𝘀𝘁 𝗣𝗮𝗿𝘁 𝗼𝗳 𝘁𝗵𝗲 𝗝𝗼𝗯: Paul finds the most reward in providing a sense of calm during a crisis, helping clients navigate the complexities of recovery to reclaim their homes.
𝗙𝗮𝘃𝗼𝗿𝗶𝘁𝗲 𝗣𝗮𝘀𝘁𝗶𝗺𝗲: Outside of work, Paul enjoys restoring vintage furniture and fishing at the lake.